上篇博客提到了Flink是基于这篇论文来实现的。所以我们先来看一下Flink基于这个理论,实现的几个数据结构。
数据结构
ShareBuffer
之前提到了,CEP的规则解析之后,本质上是一个不确定状态的转换机,所以在匹配过程中,每个状态会对应着一个或多个元素。举个三个状态的例子(省略匹配的条件(where)):
Pattern.begin("A").followedBy("B").followedBy("C")
示意图如下: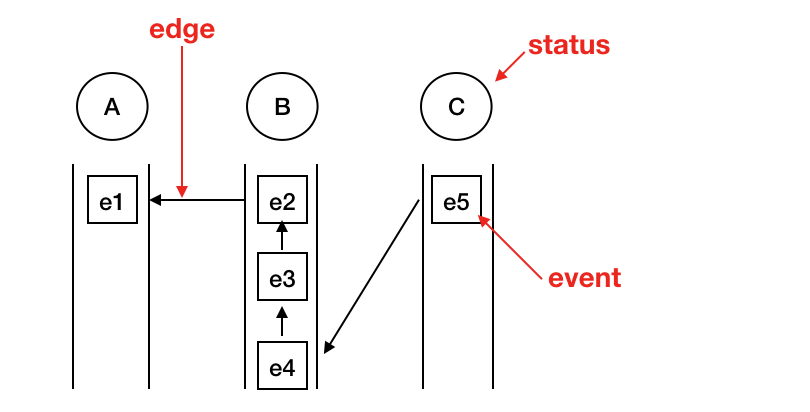
这种数据结构叫做SharedBuffer。每个事件叫做NodeId,每个NodeId由EventId和pageName,也就是状态的名字组成。同时,每个NodeId映射一个SharedBufferNode,在这个结构里有指向前一个事件的Edge,并且使用引用计数的方式来决定生命周期。关于这种数据结构出现的原因在下面会提到。
NFAState
还有一个重要的数据结构叫做NFAState。在NFAState中,保留了现有的匹配情况,其中两个重要的变量是:
private Queue<ComputationState> partialMatches; // 正在进行的匹配
private Queue<ComputationState> completedMatches; // 完成的匹配
每次接收到新的事件,都会遍历partialMatches来尝试匹配,看是否能够让partialMatch转化为completedMatch。
匹配过程
基于上面的数据结构,其实已经大概能猜到匹配的流程。当接收到一个事件后,会遍历partialMatches,计算出该匹配的下一个状态,并在ShareBuffer中添加当前事件。如果到达最终状态,partialMatch则转化成completedMatch。
final PriorityQueue<ComputationState> newPartialMatches = new PriorityQueue<>(NFAState.COMPUTATION_STATE_COMPARATOR);
final PriorityQueue<ComputationState> potentialMatches = new PriorityQueue<>(NFAState.COMPUTATION_STATE_COMPARATOR);

// iterate over all current computations
for (ComputationState computationState : nfaState.getPartialMatches()) {
    final Collection<ComputationState> newComputationStates = computeNextStates(
        sharedBuffer,
        computationState,
        event,
        event.getTimestamp());

    if (newComputationStates.size() != 1) {
        nfaState.setStateChanged();
    } else if (!newComputationStates.iterator().next().equals(computationState)) {
        nfaState.setStateChanged();
    }

    //delay adding new computation states in case a stop state is reached and we discard the path.
    final Collection<ComputationState> statesToRetain = new ArrayList<>();
    //if stop state reached in this path
    boolean shouldDiscardPath = false;
    for (final ComputationState newComputationState : newComputationStates) {

        if (isFinalState(newComputationState)) {
            potentialMatches.add(newComputationState);
        } else if (isStopState(newComputationState)) {
            //reached stop state. release entry for the stop state
            shouldDiscardPath = true;
            sharedBuffer.releaseNode(newComputationState.getPreviousBufferEntry());
        } else {
            // add new computation state; it will be processed once the next event arrives
            statesToRetain.add(newComputationState);
        }
    }

    if (shouldDiscardPath) {
        // a stop state was reached in this branch. release branch which results in removing previous event from
        // the buffer
        for (final ComputationState state : statesToRetain) {
            sharedBuffer.releaseNode(state.getPreviousBufferEntry());
        }
    } else {
        newPartialMatches.addAll(statesToRetain);
    }
}
在NFA.java中可以看到接收到事件后通过computeNextStates得到了当前partialMatch对应的的下一个状态,然后通过isFinalState和isStopState对新状态做了判断并处理,同时对ShareBuffer中的Node做了释放。
在computeNextStates中,我们可以精简一下代码变成如下所示:
final OutgoingEdges<T> outgoingEdges = createDecisionGraph(context, computationState, event.getEvent())
final List<StateTransition<T>> edges = outgoingEdges.getEdges();
final List<ComputationState> resultingComputationStates = new ArrayList<>();
for (StateTransition<T> edge : edges) {
    switch (edge.getAction()) {
        case IGNORE:
            // ...处理ignore
            break;
        case TAKE:
            // ...处理take
            break;
    }
}
在createDecisionGraph函数中,基于当前事件对CEP In Flink (1)提到的状态转换图进行解析和转化,得出了符合条件的outgoingEdges,每条Edge对应了一个Action和targetState,遍历Edge,最后生成新的状态,返回到上个代码片段中。
匹配优化
很容易想到,随着事件的流入,同时存在的partialMatch会越来越多,为了不重复创建事件,代码中创建了一个SharedBuffer的数据结构,并针对每个SharedBufferNode提供带版本的SharedBufferEdge来指向不同的上级NodeId。示意图如下:
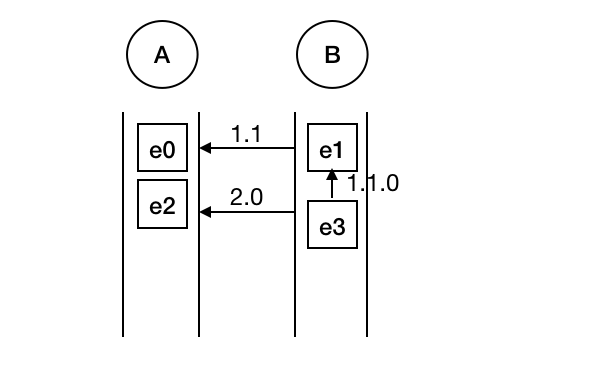
事件顺序为e0 -> e1 -> e2 -> e3,可见e3同时作为了e1和e2的后序事件,此时通过版本号来作区分。实际情况会比这个稍微复杂一些(比如示意图中没有展现1.0),但是整体的优化思路和示意图中是类似的。